Super QUICK and EASY paci clip tutorial
.jpg)
.jpg)
.jpg)
.jpg)
#3 - Prepare the strap
* Fold short ends of fabric in 1/4" or less & press with iron. (This is to hide the raw edges)
.jpg)
* If you cut the width to 3" then fold the long ends of the fabric in 1/2" on each edge OR if you cut the width to 4" then fold the long ends into where they meet in the middle. Press with iron. (3" width shown here)
.jpg) * Fold the fabric in half lengthwise and press with iron.
* Fold the fabric in half lengthwise and press with iron.
.jpg)
* Fold ribbon in half and sandwich between the layers of fabric on one end of the strap. Make sure that 1/2" or so of each end of the ribbon is inside the fold so that it will be very secure once sewn. Pin to ensure ribbon does not move.
.jpg)
* Insert pins along the strap so that the fabric won't shift during sewing.
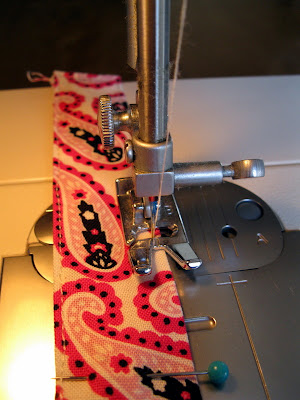
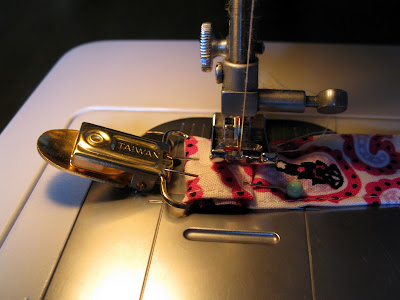
#4 - Begin sewing
* Sew around entire outside edge of the strap. Sew close to the edge, but make sure to sew through all layers of fabric! Sew back & forth a couple of times over the area with the ribbon to secure it.
.jpg)
* Next you'll attach the clip. Insert the end opposite the ribbon into the clip. Fold over about 1" or so (enough to be able sew next to the clip). Pin to keep the fabric from shifting when you sew. Near the end of the folded end, sew back and forth a few times to secure.
.jpg)
That's it!
.jpg)
.jpg)
A few disclaimers...
1) My child never really used a pacifier so I am not an expert on the best strap length for a paci clip. I looked at clips sold online and used that as a general guideline for length.
2) There may be better ways to make these clips. This is just the way I prefer to make them.
3) If you have any questions or see anything that needs to be revised please just leave a comment.
4) This clip was made to be used with a Soothie type pacifier. If you have a regular pacifier, you can change the end with the ribbon to something else. For example, you could leave off the ribbon and instead use velcro.
SUGGESTION: I made several of these for my step-mom to use. She said she likes these clips but the ribbon seems to wear out and fray quickly. Instead of ribbon, try thin cording or similar material for a more durable pacifier clip.

#1 - Gather your materials:
* Piece of fabric atleast 3" x 8". This is a great way to use up scrap fabric. (Can be longer than 8" if you'd prefer a longer strap.)
* Scrap piece of ribbon atleast 5" that coordinates with the fabric.
* A clip
* Thread to match fabric
Here are the clips I used, you can buy them various places but I found these at Wal-mart.
#2 - Prep your materials
* Cut fabric to 3" x 8" (OR - I usually cut to 4" x 8" because I like the thickness it gives the strap)
* Cut ribbon to 5"
* Cut fabric near clip to remove it
#3 - Prepare the strap
* Fold short ends of fabric in 1/4" or less & press with iron. (This is to hide the raw edges)
* If you cut the width to 3" then fold the long ends of the fabric in 1/2" on each edge OR if you cut the width to 4" then fold the long ends into where they meet in the middle. Press with iron. (3" width shown here)
* Fold ribbon in half and sandwich between the layers of fabric on one end of the strap. Make sure that 1/2" or so of each end of the ribbon is inside the fold so that it will be very secure once sewn. Pin to ensure ribbon does not move.
* Insert pins along the strap so that the fabric won't shift during sewing.
#4 - Begin sewing
* Sew around entire outside edge of the strap. Sew close to the edge, but make sure to sew through all layers of fabric! Sew back & forth a couple of times over the area with the ribbon to secure it.
* Next you'll attach the clip. Insert the end opposite the ribbon into the clip. Fold over about 1" or so (enough to be able sew next to the clip). Pin to keep the fabric from shifting when you sew. Near the end of the folded end, sew back and forth a few times to secure.
That's it!
A few disclaimers...
1) My child never really used a pacifier so I am not an expert on the best strap length for a paci clip. I looked at clips sold online and used that as a general guideline for length.
2) There may be better ways to make these clips. This is just the way I prefer to make them.
3) If you have any questions or see anything that needs to be revised please just leave a comment.
4) This clip was made to be used with a Soothie type pacifier. If you have a regular pacifier, you can change the end with the ribbon to something else. For example, you could leave off the ribbon and instead use velcro.
SUGGESTION: I made several of these for my step-mom to use. She said she likes these clips but the ribbon seems to wear out and fray quickly. Instead of ribbon, try thin cording or similar material for a more durable pacifier clip.
Comments
I absolutely LOVE your work! I appreciate the tutorials and would love to give it a try, but I don't have a sewing machine yet. Someday.....
Just wanted to thank you for the tutorial -- I just used it to make a pair of clips for my little niece, and they were a cinch! Thanks!