Month of bag making project 10 & tutorial

Gather your materials:
* 12 1/2" x 29" piece of cotton fabric for the OUTSIDE of the bag
* 12 1/2" x 29" piece of matching canvas for the LINING of the bag (or you can use regular cotton & iron on some lightweight interfacing to give it a bit of structure)
* 6 1/2" x 12 1/2" piece of fabric (same as you used for the lining) for the crayon pocket
* 2 - 4" x 20" pieces of fabric (same as you used for the outside of the bag) for the STRAPS
* 3 1/2" x 12 1/2" piece of lightweight interfacing
Coordinating thread
Sewing machine
Scissors
Ruler
Fabric pencil/pen (chalk based or disappearing ink - whichever you prefer)
~Seam allowances are 1/4"unless otherwise noted~
NOTE: The width used for the crayon slots is 3/4" which is very tight. It may be difficult for younger children to insert the crayons. If designing for a younger child, make the slots 7/8" wide. You'll need to cut your outer and inner fabrics to 14.5" x 29", your crayon pocket to 6.5" x 14.5" and your interfacing to 3.5" x 14.5". Follow all steps as below. All other changes to make the crayon slots wider will be in parenthesis and bolded.
CRAYON POCKET
Take the 6 1/2" x 12 1/2" (14.5") piece of fabric and fold it in half lengthwise with RIGHT SIDES together and iron- folded piece will be 3 1/4" x 12 1/2" (14.5"). Pin along the long open end (side opposite the fold you made). Sew.

Turn this piece right side out but putting your hand into the opening. Grab the opposite end with your fingertips and pull through.

Once the piece is turned right side out, iron flat with the seam along the bottom.
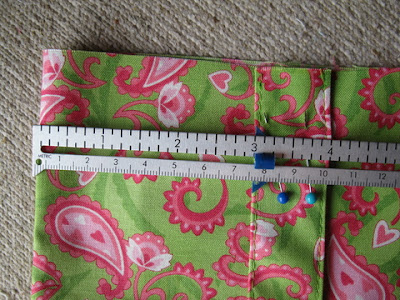
Using a ruler & erasable/disappearing pencil/pen, make marks for where to sew the crayon dividers. To do this, start on either the right or left side making a line 1" (1 1/8") from the edge. Then continue to draw lines every 3/4" (7/8") until to you reach 1" (1 1/8") from the opposite end from which you started.

You should have 15 lines. This gives an inch (1 1/8") at each end and 3/4" (7/8") space for each crayon.
BAG OUTER
You will need to place the interfacing on the WRONG side of the fabric 5 1/4" down from the top of the bag. (The top is one of the 12 1/2" (14.5") edges of the fabric). To do this, make small marks 5 1/4" down from the top on the right and left edges of the fabric. Line up the top of the piece of interfacing with these marks. Iron on the interfacing.

On the RIGHT side of the outer fabric, you'll place the crayon pocket 5 1/2" down from the top. Pin in place. Sew along each drawn line - make sure to start with a few stitches at the top of the pocket, backstitch a few stitches to above the pocket, sew normally down to the bottom of the pocket, backstitch a few stitches, forward stitch a few stitches.

This is what the top of the pocket should look like:

The bottom of the pocket will look similar except that stitches do not need to extend past the bottom of the pocket.
Sew along the bottom edge of the pocket, 1/8" from the bottom.

With RIGHT SIDES together, fold the outer fabric in half widthwise (creating a piece 12 1/2" (14.5") x 14 1/2"). Pin along both sides (leaving the top open). Sew along both edges.
Now let's add the gussets to the bottom of the bag. You'll form a triangle at one bottom of the bag by putting your hand into one of the bottom corners and opening it. Move the fabric around until it creates a triangle (the seam line should line up with center line of the bottom of the bag).

Pin to keep fabric from shifting Using your ruler and a pencil, locate and mark the place on the triangle that is 1.5" wide. Sew along the line.

Cut off the top of the triangle above your sewing line. The bottom of the bag should look like this:

Turn bag right side out.
STRAPS
Take 1 piece of the strap fabric and fold it in half lengthwise with WRONG SIDES together and iron (making the piece 2" x 20").

Open it up and fold each edge into the fold along the center and iron:

Fold the piece in half again and iron:

You'll have a strap that is 1" x 20".
Pin along the strap (pins perpendicular to the length of the strap) and topstich around entire strap. (I find it best to sew along the long open edge of the strap first).

Repeat for the second strap.
Place the outer edge of one strap 3" from the top edge of the bag. (If you can tell which is the right/wrong side of the strap based on the stitching, you'll want to place the right side of the strap against the right side of the bag. When you are finished the straps will have the correct side facing out.) Pin in place.
Sew with an 1/8" seam allowance to bag.
Repeat until all ends of straps are in place.
LINING
Fold the fabric in half widthwise (making it 12 1/2" (14.5") x 14 1/2") with RIGHT SIDES together. Toward the center of one of the side edges, place two marks 4" apart. This will create an opening for the bag to turn it right side out when you're done sewing.
Follow all the same steps as for the outside of the bag, except do not sew between the marks you created and do not turn right side out.
FINISH
The outside of your bag should be right side out. The inside of your bag should be inside out. Place the outside of the bag into the inside of your bag. Make sure you get the straps in there, too!

Pin around the top of the bag, lining up the top edges of the inside and outside pieces as best you can. I find it helpful to line up the side seams of the outer & lining fabric and pin at each seam. Then I hold the bag at both side seams and pull it flat to get all the wrinkles out. Then I add a pin at the front and back center of the bag and then fill in with more pins. I find that I can get the entire bag to line up best this way.

Stitch around the top of the bag.
Remember that opening we left in the lining? Well, now's the time to use it to turn the whole thing right side out. Begin by pulling the outside of the bag through the opening in the lining.

Then you can pull the lining through, at which point you'll have something that looks like this:

Close the opening in the lining. Place pins where the opening in the lining starts and ends and atleast 1 pin in between. With an 1/8" seam allowance begin sewing just before the 1st pin (backstitching to secure) to just past the last pin (backstitching to secure). Of if you'd prefer you can hand stitch it by using a blind stitch.

(It would best to use a thread that matches your fabric, otherwise the stitching imperfections will show like in this example)
Push the lining of the bag into the outside of the bag. Smooth the inside/outsides out the best you can. Adjust the fabric at the top of the bag so that none of the lining shows to the outside (and if you're really good it'll be completely even so that the outside doesn't show on the inside of the bag, either). Iron flat.

Pin and then toptstich along the top of the bag.

You're done!

Comments
Thank you